

Converting Above Or Below Ground Pools To Salt Water Systems
Saltwater pool conversion" might sound like there is a lot involved. If you're wondering how you convert to salt, it really doesn't involve any big procedures...
Read More


Latest Guides
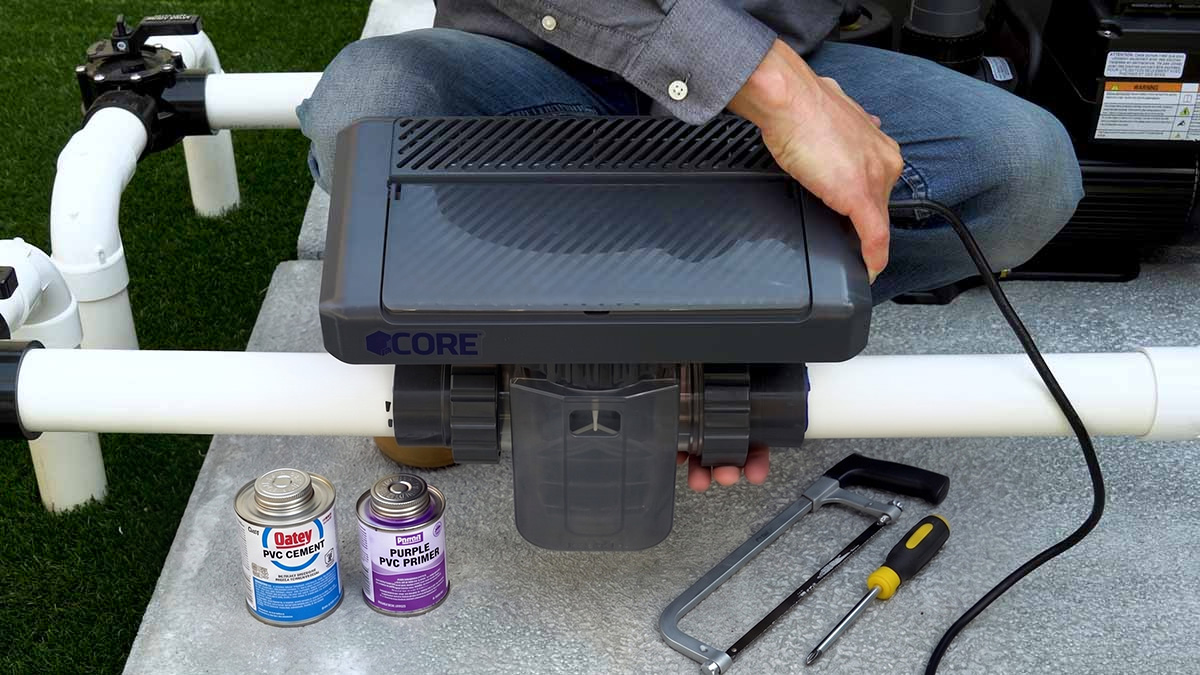
DIY Guide to Installing a Salt Water Chlorinator
Before Installing a Salt Pool System
Converting a pool to salt is three steps — choose the right system, install the salt system, and set up the salt system. This guide is the deep dive on Step 2: install — plumbing the cell into your return line, mounting the controller, wiring it up, and getting it running. It also covers adding salt to your pool water. The last step of converting your pool is finalizing its setup, which is Step 3: setting the output;covered below and in Finding the Right Output For Your Salt Chlorine Generator.)
Prefer to watch? Our installation video takes you through the whole thing.
Table of Contents:
Why Add a Salt System
Quick recap before we get our hands dirty: a salt chlorinator gives you steady, automatic chlorination, far less maintenance, softer water, and up to 40–50% lower chemical costs over its life. See the benefits of salt pools for the full picture.
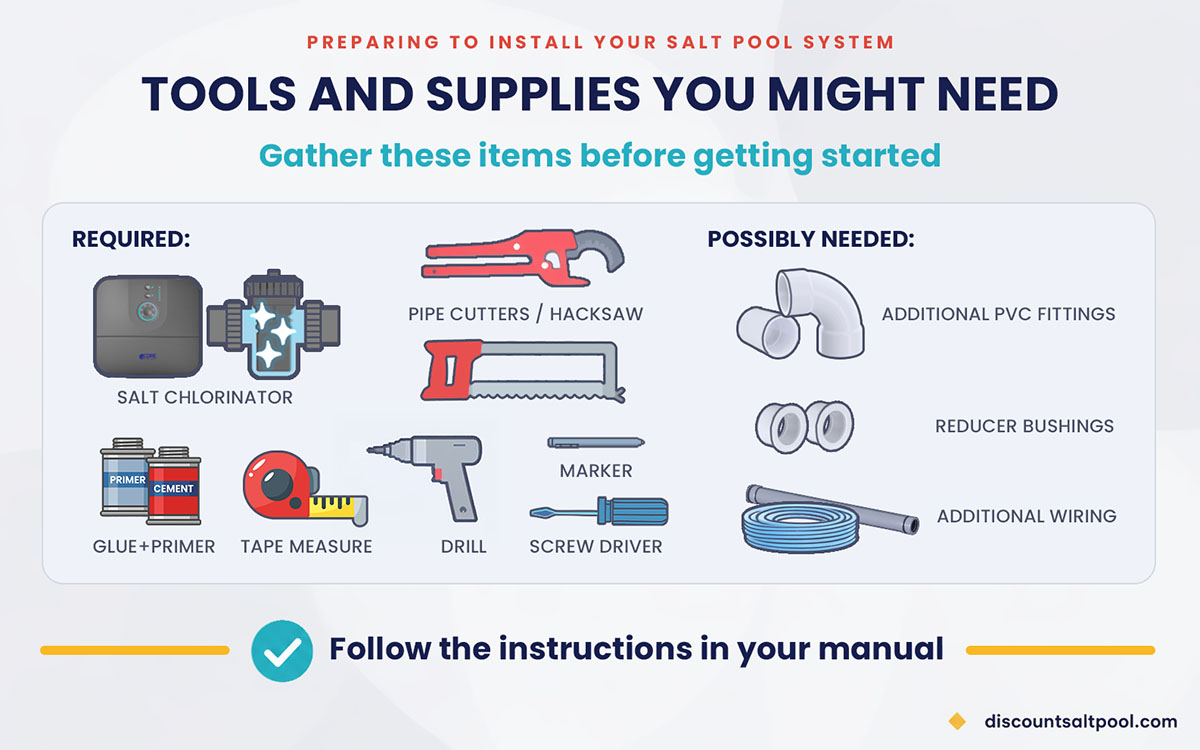
What You’ll Need Before Installation
Before you start your DIY salt chlorinator installation, it’s important to have a good understanding of your current pool equipment setup and to get prepared. SAFETY FIRST: Always follow your particular model’s instruction manual, especially when connecting to power. This overview is not a substitute for your manual. Always turn off power at the source before beginning work. Only qualified individuals should perform installation; follow all national and local codes.
Tools and Supplies to Gather for Salt Pool System Installation:
Your salt chlorine generator: Responsible for converting salt into chlorine, this is the new equipment you’ll purchase and add to your pool system. Salt chlorinators typically consist of a salt cell and control module (and often a flow switch, for many models).
You salt to add to the pool: most systems need roughly 30lbs of pool salt for every 1000 gallons of water. Be sure to test your pool’s salinity first and check your manual to know for sure exactly how much to add.
Pipe cutters (or hacksaw): Used to easily and precisely cut the pipe sections where the salt cell and connectors will be installed. In case you do not have access to a pipe cutter, a hacksaw can be used to cut the PVC pipes (be sure to sand or file smooth the edges of pipe cut with a hacksaw).
PVC primer and glue: PVC primer and cement are vital for securely bonding the pipe sections together, ensuring leak-free connections. We recommend medium-body glue, and colored glue/primer to help you ensure proper coverage.
Tape measure & marker: Used to accurately measure and mark the pipe sections for cutting and installation.
Drill / driver (possibly): Used to set the wall anchors / screws when mounting the controller (anchors / screws are included with some models).
Reducer bushings (possibly): These may be required if the diameter of your pool’s existing pipes is 1.5”, as many saltwater chlorinator models come with 2” unions. See more below.
PVC pipe & fittings (possibly): If your current pool system is very “tightly” plumbed and there is little space in which to place new components, you may need to extend sections of the plumbing using additional PVC pipe and fittings to allow room for new pool equipment.
Wiring & Wiring Accessories (Maybe): Many models come with a pre-installed power cable, and some even come ready to be plugged into a weather-protected outlet. A small number of models however do not come with a power cable pre-installed, and depending on your local code you may want to protect your wiring with conduit for added protection. See more below.
Know your plumbing before you cut: most pads are 2” or 1.5” (inner diameter) Sch40 PVC, and some above-ground setups use 1.25” or 1.5” flex hose — each needs slightly different unions or adapters. Unless marked otherwise, most salt chlorinators come with plumbing unions for 2” PVC pipe. If needed, you can easily add 1.5” PVC pipe reducer bushings or above-ground hose adapters, or get these from the hardware store locally.
Know your power source before connecting: pool equipment can run off of either 240V or 120V. Some setups will have the salt chlorinator on the same circuit as the pump, and some setups will have the salt chlorinator always powered. If utilizing a plug-in model, make sure your weather-protected GFCI outlet is within reach of where you’ll install your salt system.
Know your tools and materials. For example, when gluing PVC, press parts firmly together for 5–10 seconds to avoid slippage; allow sufficient curing time before pressurizing the pool system (follow instructions on PVC cement label).
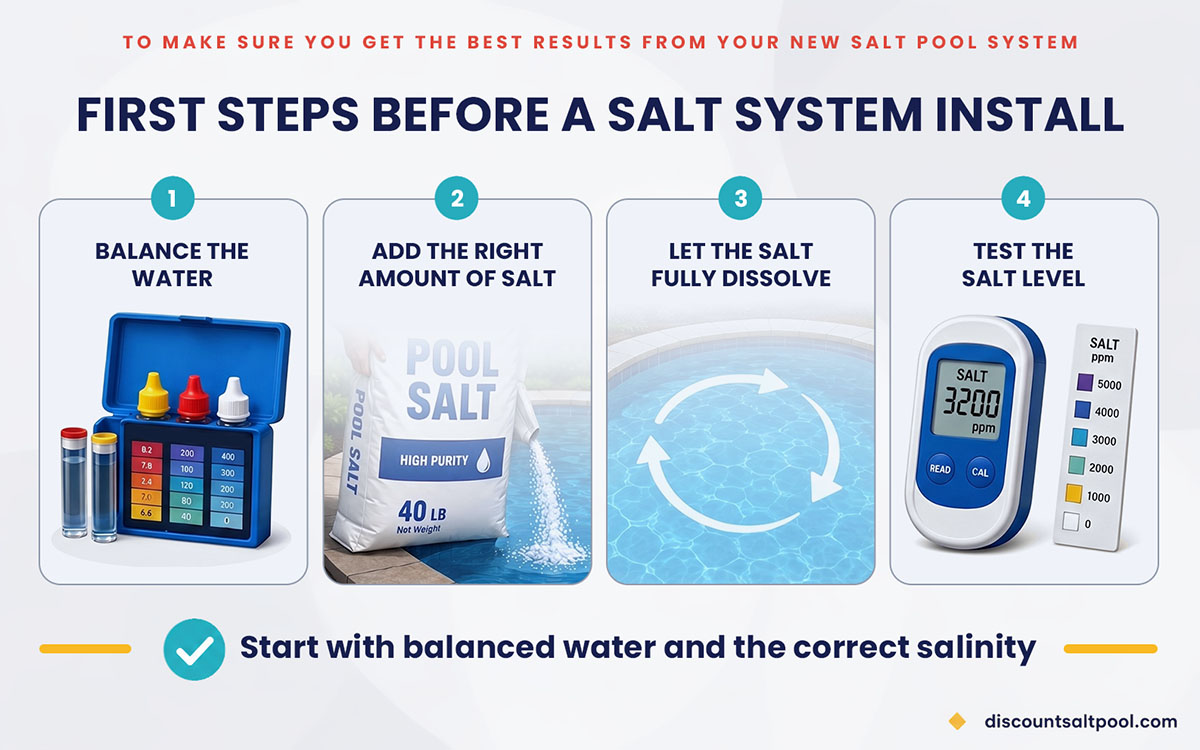
Successful Salt Pool System Installations Do These Things First
You can start taking care of these things starting with the day you order your new salt pool system. You’ll be able to turn your salt chlorinator on as soon as possible, instead of finding yourself having to wait and backtrack while your system sits there idle. Taking care of these steps ensures that everything after this point is on the path to success.
Start With a Clean Pool and Balanced Chemistry
Crucially, for the easiest salt system installation experience, you’ll want to start with a clean, balanced pool. This will ensure stress-free setup. Measure your water chemistry, balance any levels that need attention, and make sure there is no algae currently living in the pool.
Adding the Salt to the Pool Water
It’s ideal to add the salt to your pool water before installation, because it can take as much as a day or two for it all to dissolve. Getting ahead of this can help you get your salt pool conversion completed quicker! Before you power up your salt chlorinator and leave it on, you need to add the proper amount of salt to the water for your model salt system to work.
While it varies slightly by model, the typical target salinity is 3,500 ppm, which works out to be about 30 lbs of pool salt for every 1,000 gallons of water in the pool. However, before adding any salt, you’ll always want to test your water first — it can be common for there to be some level of naturally occurring salt level in the pool. If so, you’ll add slightly less salt; the system’s manual will have a chart that shows you how much salt to add based on your pool size and current salinity level in the water.
When you’re ready to add the salt, spread it across the pool, don’t just dump it in one pile. Add it to sections of the pool that are shallower, warmer, and get more circulation; these things help the salt to dissolve more quickly. Optionally, if you want to spend some effort, you can brush the floor where the salt is — though this is not typically required. Give the pump enough run time for all of it to fully dissolve and reach your target before energizing the cell — as mentioned, this typically means leaving the pump circulating for about 24 hours (or more, if necessary).
Importantly, test the water after enough time has passed. You want to confirm you have reached the proper salinity, and make adjustments as needed.
Remember that the amount of salt that you add at installation is for all intents and purposes a one time thing, unless you ever completely drain your pool. Salt doesn’t get used up when generating chlorine, or get lost through evaporation. However, you’ll continue to periodically check and add small quantities of salt (usually seasonally) in order to maintain the salinity level after rain storms or other things that dilute the pool.
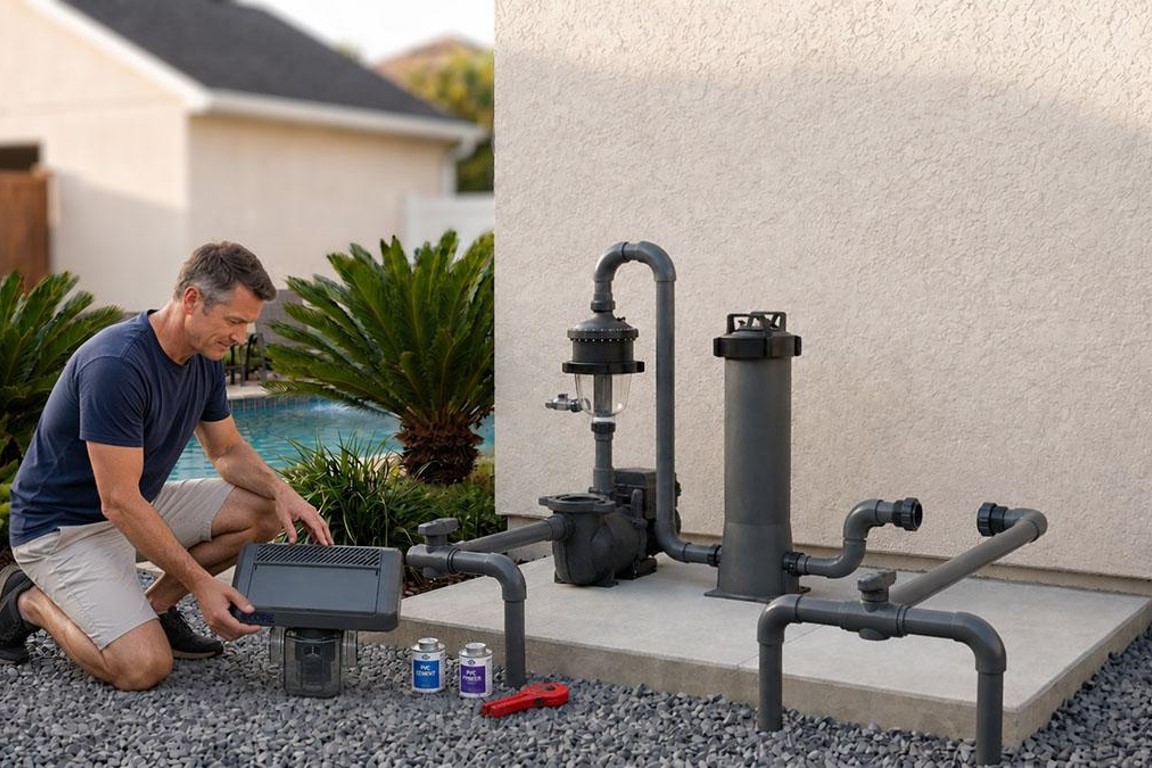
How to Install a Salt Water Chlorinator, Step by Step
These are the essential steps involved in installing a salt chlorinator’s components. While each model might vary slightly (for example: some models might not have a separate flow switch, or some models might have the controls integrated into the cell), this overview will prepare you to follow the particular steps that are outlined in the manual of the actual salt system that you choose.
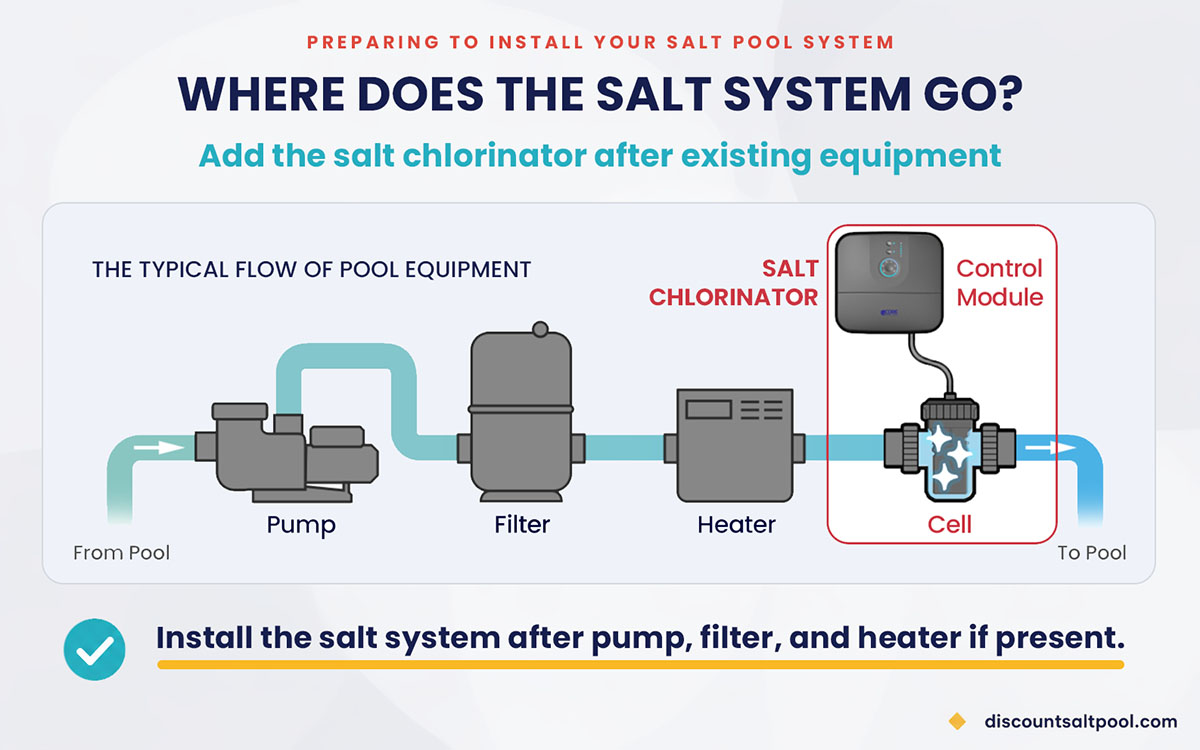
Where the Salt Chlorinator Goes in Your Pool System
The salt chlorinator’s cell is the last piece of equipment before the water returns to the pool — so the order on the pad is pump → filter → heater (if present) → salt cell → returns. Putting the cell last ensures that the treated water with higher chlorine levels go directly back into the pool. If your returns split to two sides, you typically want to plumb the cell upstream of the split (see product manuals for more options).
Tight on space? Most cells need roughly 14–18” of straight pipe — however, if you use a vertical installation kit or choose a salt chlorinator that is a compact model, you can bring that down to about 7” or so (depending on the model).
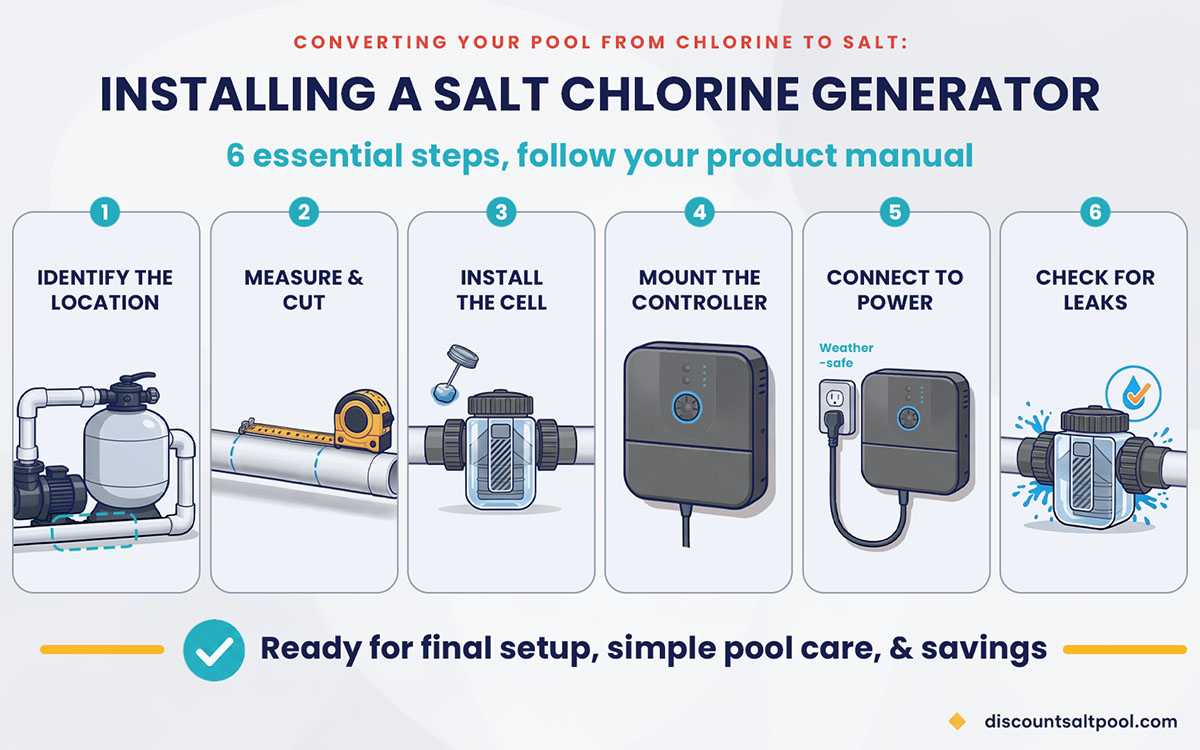
6 Steps to Installing the Salt System
Identify the location on the return line, after the heater.
Measure and cut the pipe to fit the cell and its unions (as well as the flow switch, if present).
Plumb the system in
Install the flow switch (if present) — prime and glue the flow switch housing in place.
Install the cell — prime and glue the couplers, seat the o-rings, hand-tighten the threaded unions, and connect the flow switch if your model uses one.
Mount the controller on a wall, post, or other vertical surface near the equipment. Connect the cables of the cell and flow switch (if present) to the controller.
Connect the wiring of the controller so it powers on with the pump (see the aside below).
Initial startup — first, allow enough time for the glue to fully cure before turning on your pump and pressurizing the system. When ready, start the pump and run it 5–10 minutes. Check for leaks. Turn the salt system back off until salt has been added to the pool water (see next step). .
Wiring
Most controllers are designed to run on the same circuit as your pool pump, so the generator is on whenever the pump is powered on — commonly the same timer or relay terminals the pump uses. However, many models can also be powered on all the time, and activated by their flow switch; this is common when using a programmable variable-speed pump. Additionally, some models can even be plugged into a weather-protected (optionally timer-controlled) outlet for maximum convenience.
Important: Always follow your particular model’s instruction manual, especially when connecting to power. This overview is not a substitute for your manual. Only qualified individuals should perform installation; follow all national and local codes.
Finish Converting Your Pool from Chlorine to Salt
If you’re following our salt pool conversion guide, after installing your salt system, you’ll add the salt itself to your swimming pool. Next, you’ll power on your salt system to check for any errors and then optimize it to meet your pool’s chlorination needs.
Ensure That You’ve Added Enough Salt to the Pool
Before you power up your salt chlorinator and leave it on, you need to make sure there is the proper salinity in the water for your model salt system to work. As mentioned above, the typical target salinity is 3,500 ppm for most models. Take a look at the adding salt instructions in the section above, and be sure to follow all guidelines in your product manual.
If you haven’t already added the salt to your pool, remember that it can take 24 hours of pump circulation for it all to dissolve. Leave your salt chlorinator off until you have measured the proper salinity If you try to run your system before having proper salinity in the pool water, you’ll likely trigger an error on the controller which will need to be reset once your salt levels are in range.
Setting the Chlorine Output (Dial It In)
With salt levels confirmed, power on the salt chlorinator; wait a few minutes and check that there are no warning lights while the system checks and initializes. At this point, you’ll be customizing its chlorine output setting so that it meets your pool’s unique needs. Essentially, you’ll set the output to a starting point of about 70% if you have a typically-sized salt chlorinator. Next, measure your free chlorine after a day or two, and then adjust the system up or down until you’re holding a steady 1–3 ppm free chlorine level over time. Expect a few tweaks the first week, then only seasonal changes. Follow our complete guide to find the exact right setting to match your pool’s chlorine demand — see How to Setup and Adjust Your Salt Chlorine Generator.
Prefer Not to DIY?
No problem. A handyman, plumber, or electrician can install it — or of course a local pool service. Check your options to see which route is cheaper, you may be surprised. For a professional, installation should typically be about an hour of labor or often less. And if you want an all-in-one salt chlorinator with minimal plumbing and plug-in wiring, a model like the CircuPool CORE Series installs in as little as 10–15 minutes.
Ready to Get Set Up?
Find the right-sized system for your pool with our Salt Pool Genius system finder, and use our system-sizing calculator to confirm the capacity you need. Questions? Our team supports customers who are ready to install salt pool systems every day — just call 866-766-5243.
Helpful Links: Salt Pool Maintenance | Troubleshooting a Salt System

Frequently Asked Questions
Installing a saltwater generator involves plumbing the “salt cell” into your return plumbing and connecting its control unit to power, and includes several steps. First, identify a suitable pipe section to install the salt cell and cut it out. Then, prepare the remaining pipe ends with a PVC primer, apply PVC cement on the connectors, attach them to the pipe ends, and secure your salt cell in place. Install the control unit on an accessible vertical surface nearby. Following the manufacturer's instructions, connect the control unit to the salt cell and connect the chlorinator to power, usually the same circuit as the pool pump. After the system is installed, add pool-grade salt to your pool based on the manufacturer's recommendations. Finally, power up the system and perform an initial test to ensure everything is working correctly.
The saltwater chlorinator is installed directly into the pool's circulation system. The salt cell, which converts salt into chlorine, is usually installed on the return line, after the filter and heater (if you have one), so that the water returning to the pool passes through it. The control unit, on the other hand, should be installed nearby on a wall or post that is easily accessible. Both components should be positioned according to the manufacturer's specifications to ensure optimal performance and longevity
Salt chlorine generators are safe to use with all pool surface types (ex: plaster, tile, stone, concrete, vinyl, fiberglass, and more). A vast majority of modern pools can accommodate a saltwater chlorinator installation. However, there are certain conditions that might limit the feasibility of salt generator installation. For instance, if your pool is very old and uses copper plumbing, this can interfere with the electrolysis process used by the chlorinator. Therefore, in such cases, you'll need to upgrade your plumbing to PVC, which is non-conductive and compatible with a saltwater system. Additionally, consider the physical layout of your pool equipment. You'll need sufficient space to install the chlorinator without obstructing the existing pool system's functionality.
To convert a traditional pool into a saltwater pool, the main piece of equipment you'll need is the saltwater chlorinator. Your existing pump and filter should be compatible with the new system. However, keep in mind that you'll need to add pool-grade salt to your shopping list. After the initial conversion, you don't need to regularly add salt, but you'll need to occasionally add salt when the salt chlorinator indicates, usually seasonally. This is typically to compensate for rain that you get over time.
Sizing is based on your pool's gallon capacity, not just its surface area, so a deep pool and a shallow pool of the same footprint can need different-sized generators. Manufacturers publish a maximum gallon rating for each model; as a rule of thumb, it's better to size up rather than run a unit at or near its max capacity, since that means less wear over time. Use a system-sizing calculator or our Salt Pool Genius finder to confirm the right capacity for your pool.
Yes — it's fine for water to circulate through the cell before the pool has reached proper salinity, as long as the cell itself stays powered off. Leave the chlorinator off (or in a standby/off mode on the controller) until your salt level is confirmed to be in range, then power it on. Running it energized before salinity is reached will typically just trigger an error that needs to be cleared once salt levels are correct.
It depends on the model. Some salt chlorinators are designed to run on 120V and can be plugged into a weather-protected GFCI outlet, sometimes with an included timer; others require 240V and need to be hardwired to the same circuit as your pump. Check your specific model's manual before assuming either way, and always have a qualified electrician handle any hardwiring.
Many models include a flow switch, a small safety component that keeps the cell from generating chlorine unless water is actively moving through it. If your specific model includes one, it's not optional — install it per the manual. Some compact or all-in-one models don't use a separate flow switch and instead sense flow another way, so check your model's documentation to see whether one is included and required.
A saltwater chlorinator works by using a process known as electrolysis. Pool water with a very low salinity level passes through the chlorinator cell, where an electric current splits the salt molecules into chlorine and sodium. The chlorine then sanitizes the pool, killing bacteria and algae. Afterward, the chlorine recombines with the sodium to form salt again, in a constant and efficient cycle of sanitization and renewal.
Regular maintenance of your pool system is key to its longevity and efficiency, and your saltwater chlorinator installation is no different. If maintenance is neglected, the system can experience a number of issues, including reduced chlorine production, which can lead to a green pool, and shortened cell life due to calcium buildup. Regularly cleaning the cell and testing the salt level can help you avoid these problems and keep your system running smoothly.
Not sure which salt pool system is right for you? Use our intelligent product recommendation system to see
what the best choices for you might be.
See more now ▶
Tagged Products

- Comparable Model:
 megachlor
 - Alternative Model:
 SJ20A
SJ20A - Or, thinking about upgrading your system?
Interactive Guide →


with 8-Year Limited Warranty, for up to 15,000 gallon poolsReplacing An Existing Chlorine Generator?
Add an Adapter Kit to eliminate re-plumbing.
Who We Are:
At Discount Salt Pool, we're pool owners who want to help other pool owners enjoy the simplicity and the savings of saltwater chlorine generators. Unlike the pool store or pool pros, we're not the last step of a long & overpriced distribution chain. We're lifelong swimming pool enthusiasts & experts with decades of experience in the industry who want to give other pool owners direct access to the best pool technology that's out there- along with unlimited access to our friendly customer support and online DIY resources. Discount Salt Pool is a BBB member with an A+ rating.
Did You Know?
DiscountSaltPool.com is America's largest specialty provider of saltwater swimming pool equipment. Since 1997, we've helped hundreds of thousands of people convert their pool to salt! Order online today, come visit our Texas headquarters, or call in for personalized help and recommendations.
